
Making Memory Books - An Overview
 Ignore the dizzying array of catalogs and store displays. Here's a simple guide to making memory books that will get you from boxes of photos and stacks of papers to preserved memories and stories. The key is to keep it simple and follow a plan!
Here is a recommended four-step plan for you.
Step 1 in Making Memory Books - Decide on Your Structure
Down the road, family members will likely want the memory books you are creating today. Each of your (someday) adult children may want their own books when they leave for college or marriage. And you may want to keep the memory books yourself! My personal solution for this is to create family memory books that I intend to keep myself plus books that my daughters can take possession of when they choose. Some of the content overlaps (such as birthday pictures), some things are destined only for the girls' books (cards they receive, their school papers and records, etc.).
It pays to make some decisions now, as you will be creating truly prized possessions! Who is the book being made for? Who will be the "storyteller" in the book; whose point of view will be used?
Also, in addition to deciding on how to divide your books by family members, you need to decide how you will divide your content - by theme or by chronology.
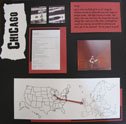
To take the theme-based approach, make a starting list of topics and consider how well your photos, memorabilia and stories flow into the list.
Here are some ideas to get you started:
Memory Book Themes
- Birth book
- Major Holidays (Christmas, Halloween, Easter, etc.)
- School Memories
- Birthdays
- Special Occasions (religious, social, family events)
- Trips & vacations
- Relationships
- Hobbies/pastimes
Memory Book Chronologies
- Birth book
- Pre-school years
- Grade school years (Click here to a download a School Memories form)
- High school years
- College years
- Adult years (maybe one album per five years)
- Wedding book
It may seem crazy to you to think so far into the future, but the truth is (1) time will fly by, (2) each member of your family will want their own memory books to take with them, and (3) you can't take memory books apart and split them up (at least not easily). You can make copies, but it is pricey to do so.
Step 2 in Making Memory Books - Gathering Supplies
Don't be overwhelmed by the abundance of scrapbooking supplies, stores, web sites and TV shows. You can make memory books, beautiful and treasured, from a short list of supplies. Of course, you may enjoy all the doodads and embellishments; if so, by all means, make yourself happy! Just remember that your books will have the most long lasting meaning if they (1) tell heartfelt family stories and (2) provide a visual window to the past.
Here are the basics you need to start with:
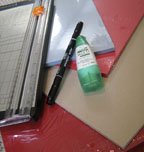
- Memory book album (look for durability and acid-free components)
- Pages to fit the album. Typically these are cardstock pages with protective sleeves or holders. The pages should be acid-free, lignin-free and buffered. Protectors should be made of polypropylene.
- (Optional) Cardstock or paper for matting photos, adding journaling, and titles
- Paper/photo trimmer
- Adhesive (should be acid-free and pass the Photograph Activity Test-PAT)
- Journaling pen or marker (should be permanent, light-and water-fast)
All other supplies you choose to add should also be checked for durability and safety. You don't want to add things that may harm the very photos and memorabilia you are trying to save!
Here's one real time-saving suggestion: decide on a single basic page layout and a two- or three-color scheme for an entire album. This has three huge benefits: First, it visually ties the book together. Second, it frees you from trying to create a unique look for every page, something that can easily take one to three hours per page to do! Lastly, it keeps you (as you make it) and the book's audience (as they enjoy it) focused on the stories and photos, not on embellishments and colors!
Step 3 in Making Memory Books - Organizing Content
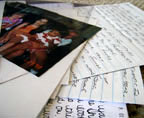 For many, this is a difficult step due to the "backlog" of photos to deal with. Still, if you make and stick with your plan from step 1, you will see how the materials can be separated into smaller and more manageable sets. Designate a box or file for each memory book you are making. Use file folders or page protectors to divide the material into specific page sets. For example, I have a drawer for school memories, with files for each school year. Page protectors hold the specific items I intend to put together on a two-page layout.
Add your thoughts and notes relating to the "story" right into the file as well, making the journaling easier later. It is far, far easier if you journal as you go, writing out thoughts, emotions, memories, conversations, etc. right after the event, not years later.
Using this system, when you sit down to work on making memory books, you can pull out and work on the album page-by-page.
On a going-forward basis, keep a notebook in your purse or camera bag. Jot things down and date them, for inclusion your memory books. I can't stress this enough! Without such content, making memories books is reduced to making pretty photo albums that tell you virtually nothing about the people, events and emotions of that day.
Step 4 in Making Memory Books - Assembly
Many scrapbookers spend hours per page assembling their memory books, picking colors and embellishments from their overflowing stash of supplies. If you have the time and like it, go for it! Realistically though, not many people can afford to spend that kind of time and make enough progress to catch up, much less stay current.
If you start an album with a basic layout and color scheme already selected, you can spend your time picking just the most meaningful photos and memorabilia, arranging them in an eye-pleasing way, and writing meaningful stories that portray your family's history, personality and chemistry.
When you sit down to work on making your memory books, you can pull out and work on the album page-by-page. Breaking the project down into such bite-sized chunks makes it far less overwhelming and far easier to make progress in small pockets of time.
If you are still overwhelmed, try this tactic. Select one page that you really like from a scrapbooking magazine or web site. Make a pencil sketch of the main elements: title, subtitle, journaling, photo #1, #2, #3, etc. Make an example page in your color scheme, without affixing the elements. Play with the elements until you like the look, and commit to it as a template! Take it as your designated layout for one memory book, allowing yourself only minor deviations, and get started.
Perfectionism is likely your biggest enemy. Take a bite-sized piece, commit to it, and start. Making memory books will get easier. And don't skip the journaling; it is truly what matters most.
Return to the top of Making Memory Books page.
To keep up with the newest information on creating life stories, we invite you to subscribe to our monthly newsletter, Memoir Musing, on our Newsletter Sign-Up page.
To see how Extraordinary Lives can help you on your journey, click on How We Help.
Go to the Home page.